Blueprint Анимация вращения и движения - Epic Wiki
# Blueprint Анимация вращения и движения
(Redirected from Blueprint Animate Rotation and Movement Tutorial RU)
# Contents
- 1 Введение
- 2 Начало работы с Blueprint
- 3 Blueprint. Пошаговое руководство
- 4 Завершение работы
- 5 Русское сообщество Unreal Engine 4
# Введение
Цель данного урока в том, чтобы иметь гибкую систему произвольных движений(анимаций). Кроме того, вы можете сделать переменную скорость в зависимости от угла поворота и движений; каждый из которых имеет собственную скорость.
Эта анимация предназначена для бесконечного цикла(повторений) - после окончания анимации, она вернется к началу. Это моя первая работа с blueprint, если есть более оптимальный способ реализации - сообщите. 
# Начало работы с Blueprint
- Создайте какой нибудь прямоугольник, или объект, например, самурайский меч;
- Сконвертируйте ваш объект в static mesh;
- Создайте blueprint-скрипт и назовите, как вам удобно;
- Добавьте ваш объект в blueprint, как компонент;
- Создайте новые переменные и функции
# Переменные
SecondsPerRot (editable, default = 1)
SecondsPerMove (editable, default = 1)
Rotations (Rotation array, editable)
Movements (Vector array, editable, show 3d widget)
MovementsWorld (Vector array)
InitialLocation (Vector)
RotFrom (int)
RotTo (int, default = 1)
MoveFrom (int)
MoveTo (int, default = 1)
fNewFrom (int)
fNewTo (int)
# Ограничения
- Щелкните правой кнопкой мыши в вашем графике событий и введите "добавить ограничения"("add timeline") и дать ему название «TimelineMovement".
- Щелкните правой кнопкой мыши в вашем графике событий и введите "добавить ограничения"("add timeline") и дать ему название «TimelineRotations".
- Для настройки ограничения кликните дважды по значку события, добавьте два ключевых события(shift + нажатие): (0,0) и (1,1);
- Подробнее об timelines вы можете узнать в офф. документации
# Функция GetNewFromAndTo
Create a new function in this blueprint. Set it's "Access Specifier" and its Inputs and Outputs per the screenshot below.
In the end you should have something like this. "Blade" below is my static mesh component, yours will be different.
# Функция GetNewFromAndTo
For lack of a better name I choose to name it this. Feel free to change it. Why is this a function? Because we need it twice, once for the movement and once for the rotations. I loathe duplicating code and feel the same when blueprinting. "DRY it up"...."don't repeat yourself" if you can help it and make functions in your blueprints! However, at this point in time I think Blueprint functions lack the proper feature to have variables scoped in their own function with the same user interface (get/set) like any other blueprint event graph variable.
That's why we have the hack variables "fNewFrom" and "fNewTo". Without these we would have to use the "Local Variables" that you see in a function, and to be honest they seem very lacking right now. These are hack variables because they are exposed outside of our function and we may accidentally edit them. Also, there could be a possibility that the finish event of our two timelines collide over these (although doubtful unless timelines are multithreaded?).
# Blueprint. Пошаговое руководство
# Как запустить анимацию
As you can see below, this blueprint can function with it's defualts. There will be no animations unless the level designer has added elements to the editable Movements and Rotations arrays. Also, we set the initial location which you will see why next.
# Настройка анимации
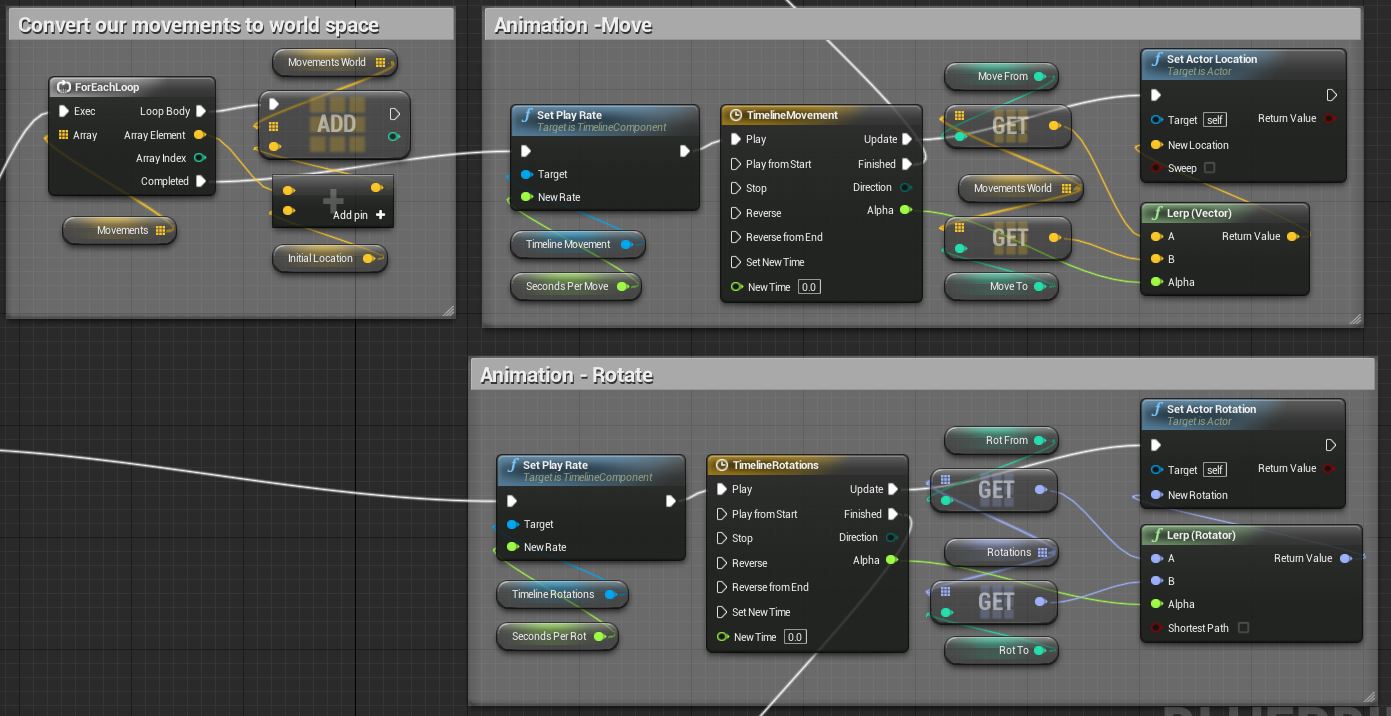
Our two Branch nodes in the above screenshot take these two paths in the screenshot below respectively. Before we setup our animations I need to point something out. All the elements that get added to the "Movements" array by the level designer will be converted to world space. So it's important that when they get created in the editor to do so with the rotation transform at 0,0,0 (if using the 3D widget for each one). Otherwise, the movement animation wont be what was desired. We do this so we can possibly procedurally spawn this blueprint in our level and have the movements be relative to wherever they are spawned.
We have two timelines, one for rotation and one for movement. You can see how we change the play rate of the timelines, wireup the update of the timelines and wire up the finished. The updates lerp and then set the new location or rotation. The real trick is all the ...to and ...from variables. Further down I will show you a function that sets those magic variables for us.
# Завершение анимации
This is the place were we call our function and set the outputs that will be used in the next time we do our animation. That function below GetNewFromAndTwo, wraps our movement and rotations array. By wrapping the array we always get a valid index for the next item to animate to. That function is shown in the next section.
1. Create the nodes below, then, wire up the "Finish" of the TimelineRotations node to the "GetNewFromAndTwo" as seen below.
2. Create the nodes below, then, wire up the "Finish" of the TimelineMovement node to the "GetNewFromAndTwo" as seen below.
# Завершение работы
Here are the settings I used that you see in the animated gif above after I placed this blueprint into my level. And after that is the thumb for the full blueprint in all it's glory. If you know of a better way to implement this please do let me know as it was a learning process for me.
Caption text
# Русское сообщество Unreal Engine 4
Русское сообщество Unreal Engine 4
Уроки по Unreal Engine 4 на Русском
Retrieved from "https://wiki.unrealengine.com/index.php?title=Blueprint_Анимация_вращения_и_движения&oldid=3999"
![]()


